| .. | ||
| README.md | ||
| requirements.txt | ||
| run_semantic_segmentation_no_trainer.py | ||
Semantic segmentation example
This directory contains a script, run_semantic_segmentation_no_trainer.py, that showcases how to fine-tune any model supported by the AutoModelForSemanticSegmentation API (such as SegFormer, BEiT, DPT) for semantic segmentation using PyTorch.
The script leverages 🤗 Accelerate, which allows to write your own training loop in PyTorch, but have it run instantly on any (distributed) environment, including CPU, multi-CPU, GPU, multi-GPU and TPU. It also supports mixed precision.
Note on custom data
In case you'd like to use the script with custom data, there are 2 things required: 1) creating a DatasetDict 2) creating an id2label mapping. Below, these are explained in more detail.
Creating a DatasetDict
The script assumes that you have a DatasetDict with 2 columns, "image" and "label", both of type Image. This can be created as follows:
from datasets import Dataset, DatasetDict, Image

image_paths_train = ["path/to/image_1.jpg/png", "path/to/image_2.jpg/png", ..., "path/to/image_n.jpg/png"]
label_paths_train = ["path/to/annotation_1.png", "path/to/annotation_2.png", ..., "path/to/annotation_n.png"]

# same for validation
# image_paths_validation = [...]
# label_paths_validation = [...]

def create_dataset(image_paths, label_paths):
    dataset = Dataset.from_dict({"image": sorted(image_paths),
                                "label": sorted(label_paths)})
    dataset = dataset.cast_column("image", Image())
    dataset = dataset.cast_column("label", Image())

    return dataset

# step 1: create Dataset objects
train_dataset = create_dataset(image_paths_train, label_paths_train)
validation_dataset = create_dataset(image_paths_validation, label_paths_validation)

# step 2: create DatasetDict
dataset = DatasetDict({
    "train": train_dataset,
    "validation": val_dataset,
  }
)

# step 3: push to hub (assumes you have ran the huggingface-cli login command in a terminal/notebook)
dataset.push_to_hub("name of repo on the hub")

# optionally, you can push to a private repo on the hub
# dataset.push_to_hub("name of repo on the hub")
An example of such a dataset can be seen at nielsr/ade20k-demo.
Creating an id2label mapping
Besides that, the script also assumes the existence of an id2label.json file in the repo, containing a mapping from integers to actual class names.
An example of that can be seen here. You can easily upload this by clicking on "Add file" in the "Files and versions" tab of your repo on the hub.
Running the script
First, run:
accelerate config
and reply to the questions asked regarding the environment on which you'd like to train. Then
accelerate test
that will check everything is ready for training. Finally, you can launch training with
accelerate launch --output_dir segformer-finetuned-sidewalk --with_tracking --push_to_hub
and boom, you're training, possibly on multiple GPUs, logging everything to all trackers found in your environment (like Weights and Biases, Tensorboard) and regularly pushing your model to the hub (with the repo name being equal to args.output_dir at your HF username) 🤗
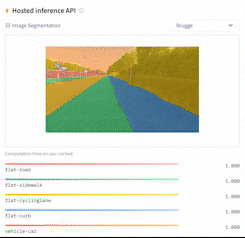
With the default settings, the script fine-tunes a SegFormer model on the segments/sidewalk-semantic dataset.
The resulting model can be seen here: https://huggingface.co/nielsr/segformer-finetuned-sidewalk.
Reload and perform inference
This means that after training, you can easily load your trained model as follows:
from transformers import AutoFeatureExtractor, AutoModelForSemanticSegmentation

model_name = "name_of_repo_on_the_hub_or_path_to_local_folder"

feature_extractor = AutoFeatureExtractor.from_pretrained(model_name)
model = AutoModelForSemanticSegmentation.from_pretrained(model_name)
and perform inference as follows:
from PIL import Image
import requests
import torch

url = "http://images.cocodataset.org/val2017/000000039769.jpg"
image = Image.open(requests.get(url, stream=True).raw)

# prepare image for the model
inputs = feature_extractor(images=image, return_tensors="pt")

with torch.no_grad():
    outputs = model(**inputs)
    logits = outputs.logits

# rescale logits to original image size
logits = nn.functional.interpolate(outputs.logits.detach().cpu(),
                                    size=image.size[::-1], # (height, width)
                                    mode='bilinear',
                                    align_corners=False)

predicted = logits.argmax(1)
For visualization of the segmentation maps, we refer to the example notebook.
Important notes
Some datasets, like scene_parse_150, contain a "background" label that is not part of the classes. The Scene Parse 150 dataset for instance contains labels between 0 and 150, with 0 being the background class, and 1 to 150 being actual class names (like "tree", "person", etc.). For these kind of datasets, one replaces the background label (0) by 255, which is the ignore_index of the PyTorch model's loss function, and reduces all labels by 1. This way, the labels are PyTorch tensors containing values between 0 and 149, and 255 for all background/padding.
In case you're training on such a dataset, make sure to set the reduce_labels flag, which will take care of this.