Update siglip.md

This was already partially fixed relative to the deployed docs. But the partial fix made it inconsistent. Additionally, giving the full text ("This is a photo of...") is likely not the desired output.
9.9 KiB
SigLIP
Overview
The SigLIP model was proposed in Sigmoid Loss for Language Image Pre-Training by Xiaohua Zhai, Basil Mustafa, Alexander Kolesnikov, Lucas Beyer. SigLIP proposes to replace the loss function used in CLIP by a simple pairwise sigmoid loss. This results in better performance in terms of zero-shot classification accuracy on ImageNet.
The abstract from the paper is the following:
We propose a simple pairwise Sigmoid loss for Language-Image Pre-training (SigLIP). Unlike standard contrastive learning with softmax normalization, the sigmoid loss operates solely on image-text pairs and does not require a global view of the pairwise similarities for normalization. The sigmoid loss simultaneously allows further scaling up the batch size, while also performing better at smaller batch sizes. Combined with Locked-image Tuning, with only four TPUv4 chips, we train a SigLiT model that achieves 84.5% ImageNet zero-shot accuracy in two days. The disentanglement of the batch size from the loss further allows us to study the impact of examples vs pairs and negative to positive ratio. Finally, we push the batch size to the extreme, up to one million, and find that the benefits of growing batch size quickly diminish, with a more reasonable batch size of 32k being sufficient.
Usage tips
- Usage of SigLIP is similar to CLIP. The main difference is the training loss, which does not require a global view of all the pairwise similarities of images and texts within a batch. One needs to apply the sigmoid activation function to the logits, rather than the softmax.
- Training is supported but does not use
torch.distributedutilities which may limit the scalability of batch size. However, DDP and FDSP works on single-node multi-gpu setup. - When using the standalone [
SiglipTokenizer] or [SiglipProcessor], make sure to passpadding="max_length"as that's how the model was trained. - To get the same results as the pipeline, a prompt template of "This is a photo of {label}." should be used.
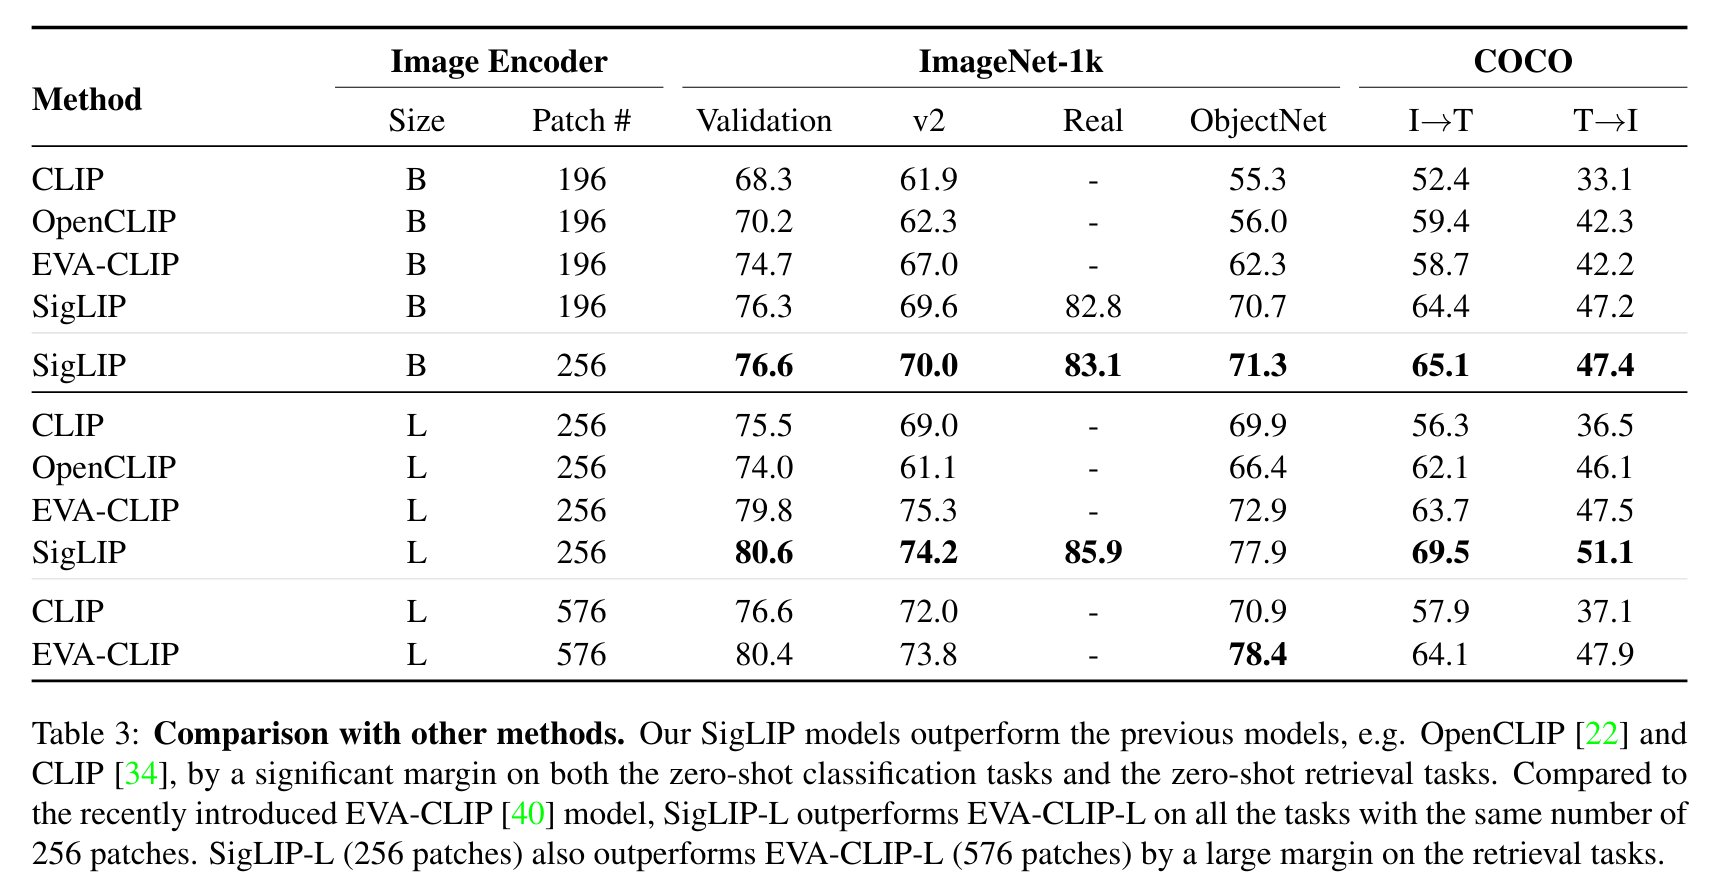
SigLIP evaluation results compared to CLIP. Taken from the original paper.
This model was contributed by nielsr. The original code can be found here.
Usage example
There are 2 main ways to use SigLIP: either using the pipeline API, which abstracts away all the complexity for you, or by using the SiglipModel class yourself.
Pipeline API
The pipeline allows to use the model in a few lines of code:
>>> from transformers import pipeline
>>> from PIL import Image
>>> import requests

>>> # load pipe
>>> image_classifier = pipeline(task="zero-shot-image-classification", model="google/siglip-base-patch16-224")

>>> # load image
>>> url = 'http://images.cocodataset.org/val2017/000000039769.jpg'
>>> image = Image.open(requests.get(url, stream=True).raw)

>>> # inference
>>> candidate_labels = ["2 cats", "a plane", "a remote"]
>>> outputs = image_classifier(image, candidate_labels=candidate_labels)
>>> outputs = [{"score": round(output["score"], 4), "label": output["label"] } for output in outputs]
>>> print(outputs)
[{'score': 0.1979, 'label': '2 cats'}, {'score': 0.0, 'label': 'a remote'}, {'score': 0.0, 'label': 'a plane'}]
Using the model yourself
If you want to do the pre- and postprocessing yourself, here's how to do that:
>>> from PIL import Image
>>> import requests
>>> from transformers import AutoProcessor, AutoModel
>>> import torch

>>> model = AutoModel.from_pretrained("google/siglip-base-patch16-224")
>>> processor = AutoProcessor.from_pretrained("google/siglip-base-patch16-224")

>>> url = "http://images.cocodataset.org/val2017/000000039769.jpg"
>>> image = Image.open(requests.get(url, stream=True).raw)

>>> candidate_labels = ["2 cats", "2 dogs"]
# follows the pipeline prompt template to get same results
>>> texts = [f'This is a photo of {label}.' for label in candidate_labels]
>>> # important: we pass `padding=max_length` since the model was trained with this
>>> inputs = processor(text=texts, images=image, padding="max_length", return_tensors="pt")

>>> with torch.no_grad():
...     outputs = model(**inputs)

>>> logits_per_image = outputs.logits_per_image
>>> probs = torch.sigmoid(logits_per_image) # these are the probabilities
>>> print(f"{probs[0][0]:.1%} that image 0 is '{candidate_labels[0]}'")
31.9% that image 0 is 'a photo of 2 cats'
Resources
A list of official Hugging Face and community (indicated by 🌎) resources to help you get started with SigLIP.
- Zero-shot image classification task guide
- Demo notebooks for SigLIP can be found here. 🌎
If you're interested in submitting a resource to be included here, please feel free to open a Pull Request and we'll review it! The resource should ideally demonstrate something new instead of duplicating an existing resource.
Combining SigLIP and Flash Attention 2
First, make sure to install the latest version of Flash Attention 2.
pip install -U flash-attn --no-build-isolation
Make also sure that you have a hardware that is compatible with Flash-Attention 2. Read more about it in the official documentation of flash-attn repository. Make also sure to load your model in half-precision (e.g. `torch.float16``)
To load and run a model using Flash Attention 2, refer to the snippet below:
>>> import torch
>>> import requests
>>> from PIL import Image
>>> from transformers import SiglipProcessor, SiglipModel
>>> device = "cuda" # the device to load the model onto

>>> model = SiglipModel.from_pretrained(
...     "google/siglip-so400m-patch14-384",
...     attn_implementation="flash_attention_2",
...     torch_dtype=torch.float16,
...     device_map=device,
... )
>>> processor = SiglipProcessor.from_pretrained("google/siglip-so400m-patch14-384")

>>> url = "http://images.cocodataset.org/val2017/000000039769.jpg"
>>> image = Image.open(requests.get(url, stream=True).raw)

>>> candidate_labels = ["2 cats", "2 dogs"]
# follows the pipeline prompt template to get same results
>>> texts = [f'This is a photo of {label}.' for label in candidate_labels]
# important: we pass `padding=max_length` since the model was trained with this
>>> inputs = processor(text=texts, images=image, padding="max_length", return_tensors="pt")
>>> inputs.to(device)

>>> with torch.no_grad():
...     with torch.autocast(device):
...         outputs = model(**inputs)

>>> logits_per_image = outputs.logits_per_image
>>> probs = torch.sigmoid(logits_per_image) # these are the probabilities
>>> print(f"{probs[0][0]:.1%} that image 0 is '{candidate_labels[0]}'")
51.3% that image 0 is 'This is a photo of 2 cats.'
Using Scaled Dot Product Attention (SDPA)
PyTorch includes a native scaled dot-product attention (SDPA) operator as part of torch.nn.functional. This function
encompasses several implementations that can be applied depending on the inputs and the hardware in use. See the
official documentation
or the GPU Inference
page for more information.
You may set attn_implementation="sdpa" in from_pretrained() to explicitly request SDPA to be used. Make sure you have torch>=2.1.1.
>>> from transformers import SiglipModel

>>> model = SiglipModel.from_pretrained(
...     "google/siglip-so400m-patch14-384",
...     attn_implementation="sdpa",
...     torch_dtype=torch.float16,
...     device_map=device,
... )
For the best speedups, we recommend loading the model in half-precision (e.g. torch.float16 or torch.bfloat16).
Expected speedups
Below is an expected speedup diagram that compares inference time between the native implementation in transformers using google/siglip-so400m-patch14-384 checkpoint in float16 precision and the Flash Attention 2 / SDPA version of the model using different batch sizes.

SiglipConfig
autodoc SiglipConfig - from_text_vision_configs
SiglipTextConfig
autodoc SiglipTextConfig
SiglipVisionConfig
autodoc SiglipVisionConfig
SiglipTokenizer
autodoc SiglipTokenizer - build_inputs_with_special_tokens - get_special_tokens_mask - create_token_type_ids_from_sequences - save_vocabulary
SiglipImageProcessor
autodoc SiglipImageProcessor - preprocess
SiglipProcessor
autodoc SiglipProcessor
SiglipModel
autodoc SiglipModel - forward - get_text_features - get_image_features
SiglipTextModel
autodoc SiglipTextModel - forward
SiglipVisionModel
autodoc SiglipVisionModel - forward
SiglipForImageClassification
autodoc SiglipForImageClassification - forward