14 KiB
LLaVA-NeXT
Overview
The LLaVA-NeXT model was proposed in LLaVA-NeXT: Improved reasoning, OCR, and world knowledge by Haotian Liu, Chunyuan Li, Yuheng Li, Bo Li, Yuanhan Zhang, Sheng Shen, Yong Jae Lee. LLaVa-NeXT (also called LLaVa-1.6) improves upon LLaVa by increasing the input image resolution and training on an improved visual instruction tuning dataset to improve OCR and common sense reasoning.
The introduction from the blog is the following:
*In October 2023, we released LLaVA-1.5 with a simple and efficient design along with great performance on a benchmark suite of 12 datasets. It has since served as the foundation of many comprehensive studies of data, model, and capabilities of large multimodal models (LMM), and has enabled various new applications.
Today, we are thrilled to present LLaVA-NeXT, with improved reasoning, OCR, and world knowledge. LLaVA-NeXT even exceeds Gemini Pro on several benchmarks.
Compared with LLaVA-1.5, LLaVA-NeXT has several improvements:
Increasing the input image resolution to 4x more pixels. This allows it to grasp more visual details. It supports three aspect ratios, up to 672x672, 336x1344, 1344x336 resolution. Better visual reasoning and OCR capability with an improved visual instruction tuning data mixture. Better visual conversation for more scenarios, covering different applications. Better world knowledge and logical reasoning. Efficient deployment and inference with SGLang. Along with performance improvements, LLaVA-NeXT maintains the minimalist design and data efficiency of LLaVA-1.5. It re-uses the pretrained connector of LLaVA-1.5, and still uses less than 1M visual instruction tuning samples. The largest 34B variant finishes training in ~1 day with 32 A100s.*
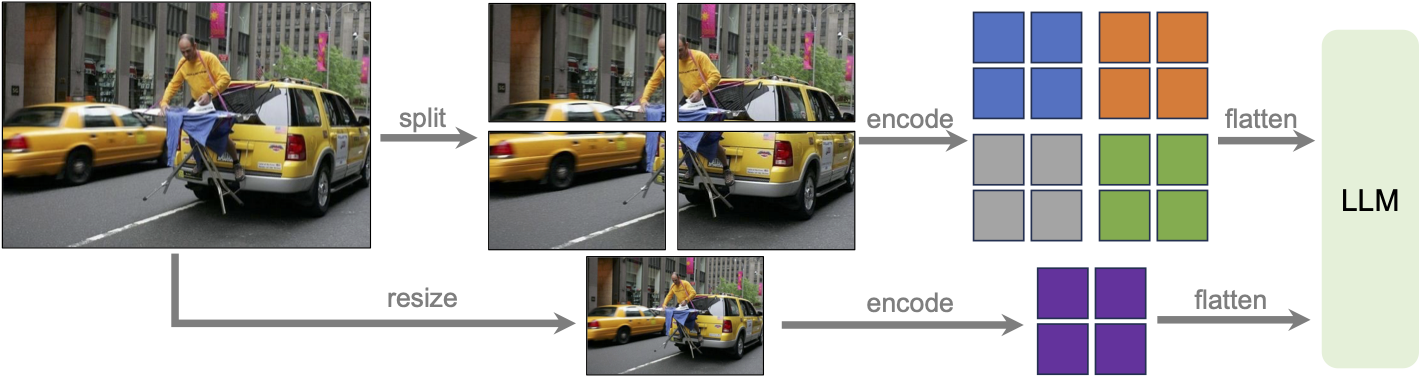
LLaVa-NeXT incorporates a higher input resolution by encoding various patches of the input image. Taken from the original paper.
This model was contributed by nielsr. The original code can be found here.
Usage tips
- We advise users to use
padding_side="left"when computing batched generation as it leads to more accurate results. Simply make sure to callprocessor.tokenizer.padding_side = "left"before generating.
- Llava-Next uses different number of patches for images and thus has to pad the inputs inside modeling code, aside from the padding done when processing the inputs. The default setting is "left-padding" if model is in
eval()mode, otherwise "right-padding".
Note
LLaVA models after release v4.46 will raise warnings about adding
processor.patch_size = {{patch_size}},processor.num_additional_image_tokens = {{num_additional_image_tokens}}and processor.vision_feature_select_strategy = {{vision_feature_select_strategy}}. It is strongly recommended to add the attributes to the processor if you own the model checkpoint, or open a PR if it is not owned by you. Adding these attributes means that LLaVA will try to infer the number of image tokens required per image and expand the text with as manyplaceholders as there will be tokens. Usually it is around 500 tokens per image, so make sure that the text is not truncated as otherwise there will be failure when merging the embeddings. The attributes can be obtained from model config, asmodel.config.vision_config.patch_sizeormodel.config.vision_feature_select_strategy. Thenum_additional_image_tokensshould be1if the vision backbone adds a CLS token or0` if nothing extra is added to the vision patches.
Formatting Prompts with Chat Templates
Each checkpoint is trained with a specific prompt format, depending on the underlying large language model backbone. To ensure correct formatting, use the processor’s apply_chat_template method.
Important:
- You must construct a conversation history — passing a plain string won't work.
- Each message should be a dictionary with
"role"and"content"keys. - The
"content"should be a list of dictionaries for different modalities like"text"and"image".
Here’s an example of how to structure your input. We will use llava-v1.6-mistral-7b-hf and a conversation history of text and image.
from transformers import LlavaNextProcessor

processor = LlavaNextProcessor.from_pretrained("llava-hf/llava-v1.6-mistral-7b-hf")

conversation = [
    {
        "role": "user",
        "content": [
            {"type": "image"},
            {"type": "text", "text": "What’s shown in this image?"},
        ],
    },
    {
        "role": "assistant",
        "content": [{"type": "text", "text": "This image shows a red stop sign."},]
    },
    {

        "role": "user",
        "content": [
            {"type": "text", "text": "Describe the image in more details."},
        ],
    },
]

text_prompt = processor.apply_chat_template(conversation, add_generation_prompt=True)

# Note that the template simply formats your prompt, you still have to tokenize it and obtain pixel values for your images
print(text_prompt)
>>> "[INST] <image>\nWhat's shown in this image? [/INST] This image shows a red stop sign. [INST] Describe the image in more details. [/INST]"
- If you want to construct a chat prompt yourself, below is a list of possible formats . llava-v1.6-mistral-7b-hf requires the following format:
"[INST] <image>\nWhat is shown in this image? [/INST]"
llava-v1.6-vicuna-7b-hf and llava-v1.6-vicuna-13b-hf require the following format:
"A chat between a curious human and an artificial intelligence assistant. The assistant gives helpful, detailed, and polite answers to the human's questions. USER: <image>\nWhat is shown in this image? ASSISTANT:"
llava-v1.6-34b-hf requires the following format:
"<|im_start|>system\nAnswer the questions.<|im_end|><|im_start|>user\n<image>\nWhat is shown in this image?<|im_end|><|im_start|>assistant\n"
llama3-llava-next-8b-hf requires the following format:
"<|start_header_id|>system<|end_header_id|>\n\nYou are a helpful language and vision assistant. You are able to understand the visual content that the user provides, and assist the user with a variety of tasks using natural language.<|eot_id|><|start_header_id|><|start_header_id|>user<|end_header_id|>\n\n<image>\nWhat is shown in this image?<|eot_id|><|start_header_id|>assistant<|end_header_id|>\n\n"
llava-next-72b-hf and llava-next-110b-hf require the following format:
"<|im_start|>system\nYou are a helpful assistant.<|im_end|>\n<|im_start|>user\n<image>\nWhat is shown in this image?<|im_end|>\n<|im_start|>assistant\n"
🚀 Bonus: If you're using transformers>=4.49.0, you can also get a vectorized output from apply_chat_template. See the Usage Examples below for more details on how to use it.
Usage example
Single image inference
Here's how to load the model and perform inference in half-precision (torch.float16):
from transformers import LlavaNextProcessor, LlavaNextForConditionalGeneration
import torch
from PIL import Image
import requests

processor = LlavaNextProcessor.from_pretrained("llava-hf/llava-v1.6-mistral-7b-hf")

model = LlavaNextForConditionalGeneration.from_pretrained("llava-hf/llava-v1.6-mistral-7b-hf", torch_dtype=torch.float16)
model.to("cuda:0")

# prepare image and text prompt, using the appropriate prompt template
url = "https://github.com/haotian-liu/LLaVA/blob/1a91fc274d7c35a9b50b3cb29c4247ae5837ce39/images/llava_v1_5_radar.jpg?raw=true"
image = Image.open(requests.get(url, stream=True).raw)

conversation = [
    {
        "role": "user",
        "content": [
            {"type": "image"},
            {"type": "text", "text": "What is shown in this image?"},
        ],
    },
]
prompt = processor.apply_chat_template(conversation, add_generation_prompt=True)
inputs = processor(image, prompt, return_tensors="pt").to("cuda:0")

# autoregressively complete prompt
output = model.generate(**inputs, max_new_tokens=100)

print(processor.decode(output[0], skip_special_tokens=True))
Multi image inference
LLaVa-Next can perform inference with multiple images as input, where images either belong to the same prompt or different prompts (in batched inference). Here is how you can do it:
import requests
from PIL import Image
import torch
from transformers import AutoProcessor, AutoModelForImageTextToText

# Load the model in half-precision
model = AutoModelForImageTextToText.from_pretrained("llava-hf/llava-v1.6-mistral-7b-hf", torch_dtype=torch.float16, device_map="auto")
processor = AutoProcessor.from_pretrained("llava-hf/llava-v1.6-mistral-7b-hf")

# Get three different images
url = "https://www.ilankelman.org/stopsigns/australia.jpg"
image_stop = Image.open(requests.get(url, stream=True).raw)

url = "http://images.cocodataset.org/val2017/000000039769.jpg"
image_cats = Image.open(requests.get(url, stream=True).raw)

url = "https://huggingface.co/microsoft/kosmos-2-patch14-224/resolve/main/snowman.jpg"
image_snowman = Image.open(requests.get(url, stream=True).raw)

# Prepare a batch of two prompts, where the first one is a multi-turn conversation and the second is not
conversation_1 = [
    {
        "role": "user",
        "content": [
            {"type": "image"},
            {"type": "text", "text": "What is shown in this image?"},
            ],
    },
    {
        "role": "assistant",
        "content": [
            {"type": "text", "text": "There is a red stop sign in the image."},
            ],
    },
    {
        "role": "user",
        "content": [
            {"type": "image"},
            {"type": "text", "text": "What about this image? How many cats do you see?"},
            ],
    },
]

conversation_2 = [
    {
        "role": "user",
        "content": [
            {"type": "image"},
            {"type": "text", "text": "What is shown in this image?"},
            ],
    },
]

prompt_1 = processor.apply_chat_template(conversation_1, add_generation_prompt=True)
prompt_2 = processor.apply_chat_template(conversation_2, add_generation_prompt=True)
prompts = [prompt_1, prompt_2]

# We can simply feed images in the order they have to be used in the text prompt
# Each "<image>" token uses one image leaving the next for the subsequent "<image>" tokens
inputs = processor(images=[image_stop, image_cats, image_snowman], text=prompts, padding=True, return_tensors="pt").to(model.device)

# Generate
generate_ids = model.generate(**inputs, max_new_tokens=30)
processor.batch_decode(generate_ids, skip_special_tokens=True, clean_up_tokenization_spaces=False)
Model optimization
Quantization using Bitsandbytes
The model can be loaded in 8 or 4 bits, greatly reducing the memory requirements while maintaining the performance of the original model. First make sure to install bitsandbytes, pip install bitsandbytes, and to have access to a GPU/accelerator that is supported by the library.
bitsandbytes is being refactored to support multiple backends beyond CUDA. Currently, ROCm (AMD GPU) and Intel CPU implementations are mature, with Intel XPU in progress and Apple Silicon support expected by Q4/Q1. For installation instructions and the latest backend updates, visit this link.
We value your feedback to help identify bugs before the full release! Check out these docs for more details and feedback links.
Simply change the snippet above with:
from transformers import AutoModelForImageTextToText, BitsAndBytesConfig

# specify how to quantize the model
quantization_config = BitsAndBytesConfig(
    load_in_4bit=True,
    bnb_4bit_quant_type="nf4",
    bnb_4bit_compute_dtype=torch.float16,
)

model = AutoModelForImageTextToText.from_pretrained("llava-hf/llava-v1.6-mistral-7b-hf", quantization_config=quantization_config, device_map="auto")
Use Flash-Attention 2 to further speed-up generation
First make sure to install flash-attn. Refer to the original repository of Flash Attention regarding that package installation. Simply change the snippet above with:
from transformers import AutoModelForImageTextToText

model = AutoModelForImageTextToText.from_pretrained(
    model_id,
    torch_dtype=torch.float16,
    use_flash_attention_2=True
).to(0)
LlavaNextConfig
autodoc LlavaNextConfig
LlavaNextImageProcessor
autodoc LlavaNextImageProcessor - preprocess
LlavaNextImageProcessorFast
autodoc LlavaNextImageProcessorFast - preprocess
LlavaNextProcessor
autodoc LlavaNextProcessor
LlavaNextModel
autodoc LlavaNextModel
LlavaNextForConditionalGeneration
autodoc LlavaNextForConditionalGeneration - forward