# Monocular depth estimation
Monocular depth estimation is a computer vision task that involves predicting the depth information of a scene from a
single image. In other words, it is the process of estimating the distance of objects in a scene from
a single camera viewpoint.
Monocular depth estimation has various applications, including 3D reconstruction, augmented reality, autonomous driving,
and robotics. It is a challenging task as it requires the model to understand the complex relationships between objects
in the scene and the corresponding depth information, which can be affected by factors such as lighting conditions,
occlusion, and texture.
There are two main depth estimation categories:
- **Absolute depth estimation**: This task variant aims to provide exact depth measurements from the camera. The term is used interchangeably with metric depth estimation, where depth is provided in precise measurements in meters or feet. Absolute depth estimation models output depth maps with numerical values that represent real-world distances.
- **Relative depth estimation**: Relative depth estimation aims to predict the depth order of objects or points in a scene without providing the precise measurements. These models output a depth map that indicates which parts of the scene are closer or farther relative to each other without the actual distances to A and B.
In this guide, we will see how to infer with [Depth Anything V2](https://huggingface.co/depth-anything/Depth-Anything-V2-Large), a state-of-the-art zero-shot relative depth estimation model, and [ZoeDepth](https://huggingface.co/docs/transformers/main/en/model_doc/zoedepth), an absolute depth estimation model.
Check the [Depth Estimation](https://huggingface.co/tasks/depth-estimation) task page to view all compatible architectures and checkpoints.
Before we begin, we need to install the latest version of Transformers:
```bash
pip install -q -U transformers
```
## Depth estimation pipeline
The simplest way to try out inference with a model supporting depth estimation is to use the corresponding [`pipeline`].
Instantiate a pipeline from a [checkpoint on the Hugging Face Hub](https://huggingface.co/models?pipeline_tag=depth-estimation&sort=downloads):
```py
>>> from transformers import pipeline
>>> import torch
>>> device = "cuda" if torch.cuda.is_available() else "cpu"
>>> checkpoint = "depth-anything/Depth-Anything-V2-base-hf"
>>> pipe = pipeline("depth-estimation", model=checkpoint, device=device)
```
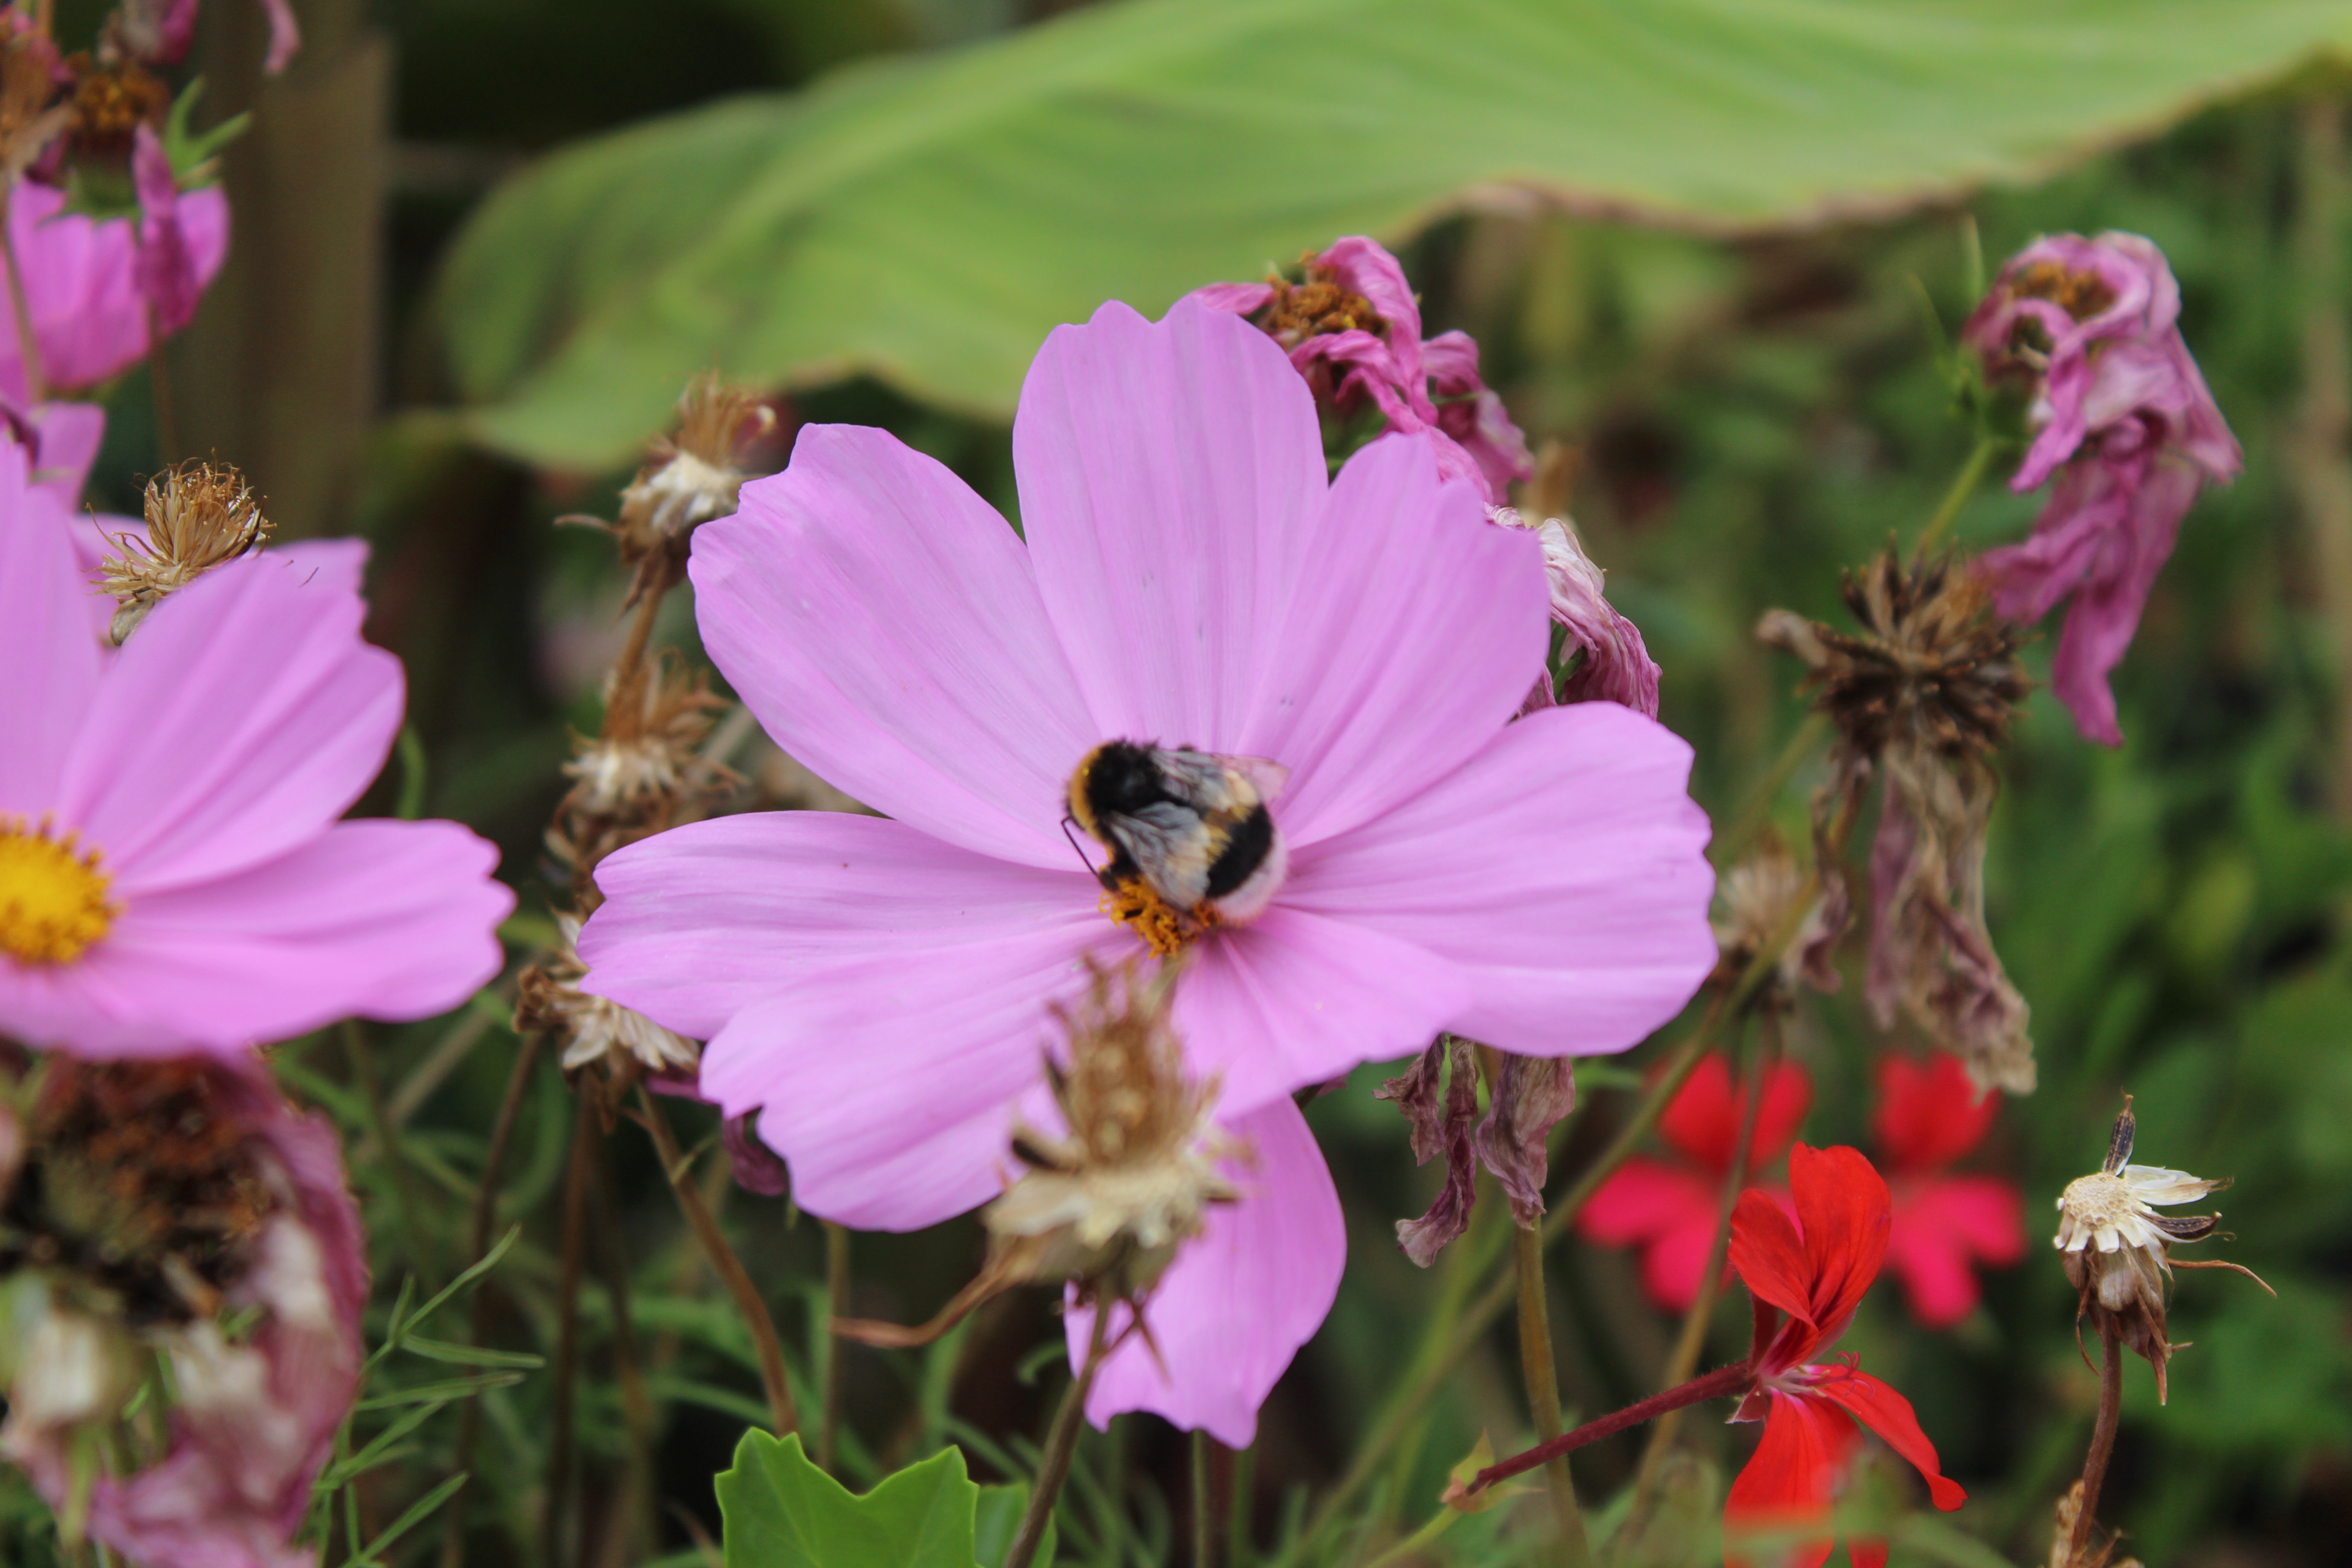
Next, choose an image to analyze:
```py
>>> from PIL import Image
>>> import requests
>>> url = "https://huggingface.co/datasets/huggingface/documentation-images/resolve/main/bee.jpg"
>>> image = Image.open(requests.get(url, stream=True).raw)
>>> image
```
Pass the image to the pipeline.
```py
>>> predictions = pipe(image)
```
The pipeline returns a dictionary with two entries. The first one, called `predicted_depth`, is a tensor with the values
being the depth expressed in meters for each pixel.
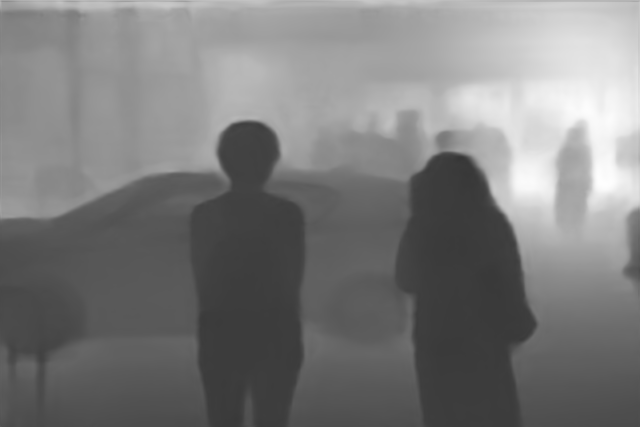
The second one, `depth`, is a PIL image that visualizes the depth estimation result.
Let's take a look at the visualized result:
```py
>>> predictions["depth"]
```
## Depth estimation inference by hand
Now that you've seen how to use the depth estimation pipeline, let's see how we can replicate the same result by hand.
Start by loading the model and associated processor from a [checkpoint on the Hugging Face Hub](https://huggingface.co/models?pipeline_tag=depth-estimation&sort=downloads).
Here we'll use the same checkpoint as before:
```py
>>> from transformers import AutoImageProcessor, AutoModelForDepthEstimation
>>> checkpoint = "Intel/zoedepth-nyu-kitti"
>>> image_processor = AutoImageProcessor.from_pretrained(checkpoint)
>>> model = AutoModelForDepthEstimation.from_pretrained(checkpoint).to(device)
```
Prepare the image input for the model using the `image_processor` that will take care of the necessary image transformations
such as resizing and normalization:
```py
>>> pixel_values = image_processor(image, return_tensors="pt").pixel_values.to(device)
```
Pass the prepared inputs through the model:
```py
>>> import torch
>>> with torch.no_grad():
... outputs = model(pixel_values)
```
Let's post-process and visualize the results.
We need to pad and then resize the outputs so that predicted depth map has the same dimension as the original image. After resizing we will remove the padded regions from the depth.
```py
>>> import numpy as np
>>> import torch.nn.functional as F
>>> predicted_depth = outputs.predicted_depth.unsqueeze(dim=1)
>>> height, width = pixel_values.shape[2:]
>>> height_padding_factor = width_padding_factor = 3
>>> pad_h = int(np.sqrt(height/2) * height_padding_factor)
>>> pad_w = int(np.sqrt(width/2) * width_padding_factor)
>>> if predicted_depth.shape[-2:] != pixel_values.shape[-2:]:
>>> predicted_depth = F.interpolate(predicted_depth, size= (height, width), mode='bicubic', align_corners=False)
>>> if pad_h > 0:
predicted_depth = predicted_depth[:, :, pad_h:-pad_h,:]
>>> if pad_w > 0:
predicted_depth = predicted_depth[:, :, :, pad_w:-pad_w]
```
We can now visualize the results (the function below is taken from the [GaussianObject](https://github.com/GaussianObject/GaussianObject/blob/ad6629efadb57902d5f8bc0fa562258029a4bdf1/pred_monodepth.py#L11) framework).
```py
import matplotlib
def colorize(value, vmin=None, vmax=None, cmap='gray_r', invalid_val=-99, invalid_mask=None, background_color=(128, 128, 128, 255), gamma_corrected=False, value_transform=None):
"""Converts a depth map to a color image.
Args:
value (torch.Tensor, numpy.ndarray): Input depth map. Shape: (H, W) or (1, H, W) or (1, 1, H, W). All singular dimensions are squeezed
vmin (float, optional): vmin-valued entries are mapped to start color of cmap. If None, value.min() is used. Defaults to None.
vmax (float, optional): vmax-valued entries are mapped to end color of cmap. If None, value.max() is used. Defaults to None.
cmap (str, optional): matplotlib colormap to use. Defaults to 'magma_r'.
invalid_val (int, optional): Specifies value of invalid pixels that should be colored as 'background_color'. Defaults to -99.
invalid_mask (numpy.ndarray, optional): Boolean mask for invalid regions. Defaults to None.
background_color (tuple[int], optional): 4-tuple RGB color to give to invalid pixels. Defaults to (128, 128, 128, 255).
gamma_corrected (bool, optional): Apply gamma correction to colored image. Defaults to False.
value_transform (Callable, optional): Apply transform function to valid pixels before coloring. Defaults to None.
Returns:
numpy.ndarray, dtype - uint8: Colored depth map. Shape: (H, W, 4)
"""
if isinstance(value, torch.Tensor):
value = value.detach().cpu().numpy()
value = value.squeeze()
if invalid_mask is None:
invalid_mask = value == invalid_val
mask = np.logical_not(invalid_mask)
# normalize
vmin = np.percentile(value[mask],2) if vmin is None else vmin
vmax = np.percentile(value[mask],85) if vmax is None else vmax
if vmin != vmax:
value = (value - vmin) / (vmax - vmin) # vmin..vmax
else:
# Avoid 0-division
value = value * 0.
# squeeze last dim if it exists
# grey out the invalid values
value[invalid_mask] = np.nan
cmapper = matplotlib.colormaps.get_cmap(cmap)
if value_transform:
value = value_transform(value)
# value = value / value.max()
value = cmapper(value, bytes=True) # (nxmx4)
# img = value[:, :, :]
img = value[...]
img[invalid_mask] = background_color
# return img.transpose((2, 0, 1))
if gamma_corrected:
# gamma correction
img = img / 255
img = np.power(img, 2.2)
img = img * 255
img = img.astype(np.uint8)
return img
>>> result = colorize(predicted_depth.cpu().squeeze().numpy())
>>> Image.fromarray(result)
```