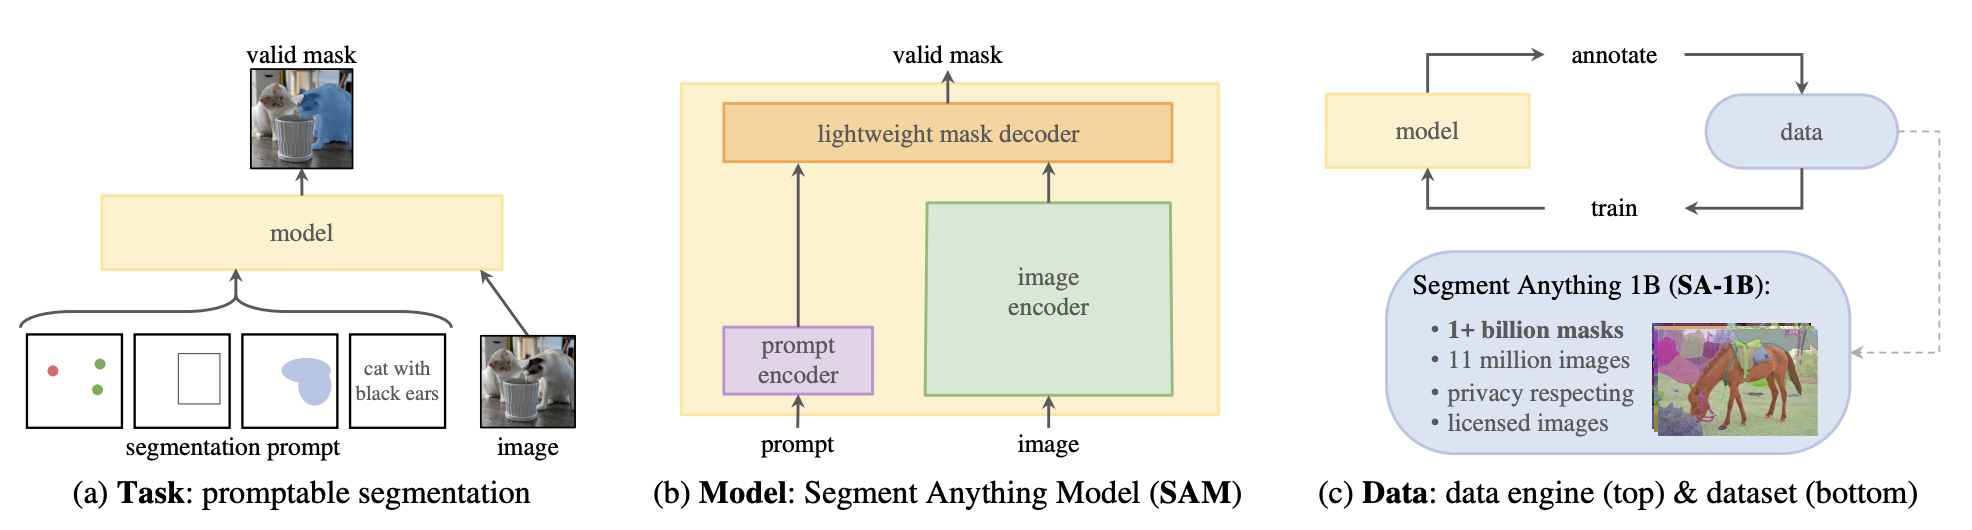
# Mask Generation
Mask generation is the task of generating semantically meaningful masks for an image.
This task is very similar to [image segmentation](semantic_segmentation), but many differences exist. Image segmentation models are trained on labeled datasets and are limited to the classes they have seen during training; they return a set of masks and corresponding classes, given an image.
Mask generation models are trained on large amounts of data and operate in two modes.
- Prompting mode: In this mode, the model takes in an image and a prompt, where a prompt can be a 2D point location (XY coordinates) in the image within an object or a bounding box surrounding an object. In prompting mode, the model only returns the mask over the object
that the prompt is pointing out.
- Segment Everything mode: In segment everything, given an image, the model generates every mask in the image. To do so, a grid of points is generated and overlaid on the image for inference.
Mask generation task is supported by [Segment Anything Model (SAM)](model_doc/sam). It's a powerful model that consists of a Vision Transformer-based image encoder, a prompt encoder, and a two-way transformer mask decoder. Images and prompts are encoded, and the decoder takes these embeddings and generates valid masks.
SAM serves as a powerful foundation model for segmentation as it has large data coverage. It is trained on
[SA-1B](https://ai.meta.com/datasets/segment-anything/), a dataset with 1 million images and 1.1 billion masks.
In this guide, you will learn how to:
- Infer in segment everything mode with batching,
- Infer in point prompting mode,
- Infer in box prompting mode.
First, let's install `transformers`:
```bash
pip install -q transformers
```
## Mask Generation Pipeline
The easiest way to infer mask generation models is to use the `mask-generation` pipeline.
```python
>>> from transformers import pipeline
>>> checkpoint = "facebook/sam-vit-base"
>>> mask_generator = pipeline(model=checkpoint, task="mask-generation")
```
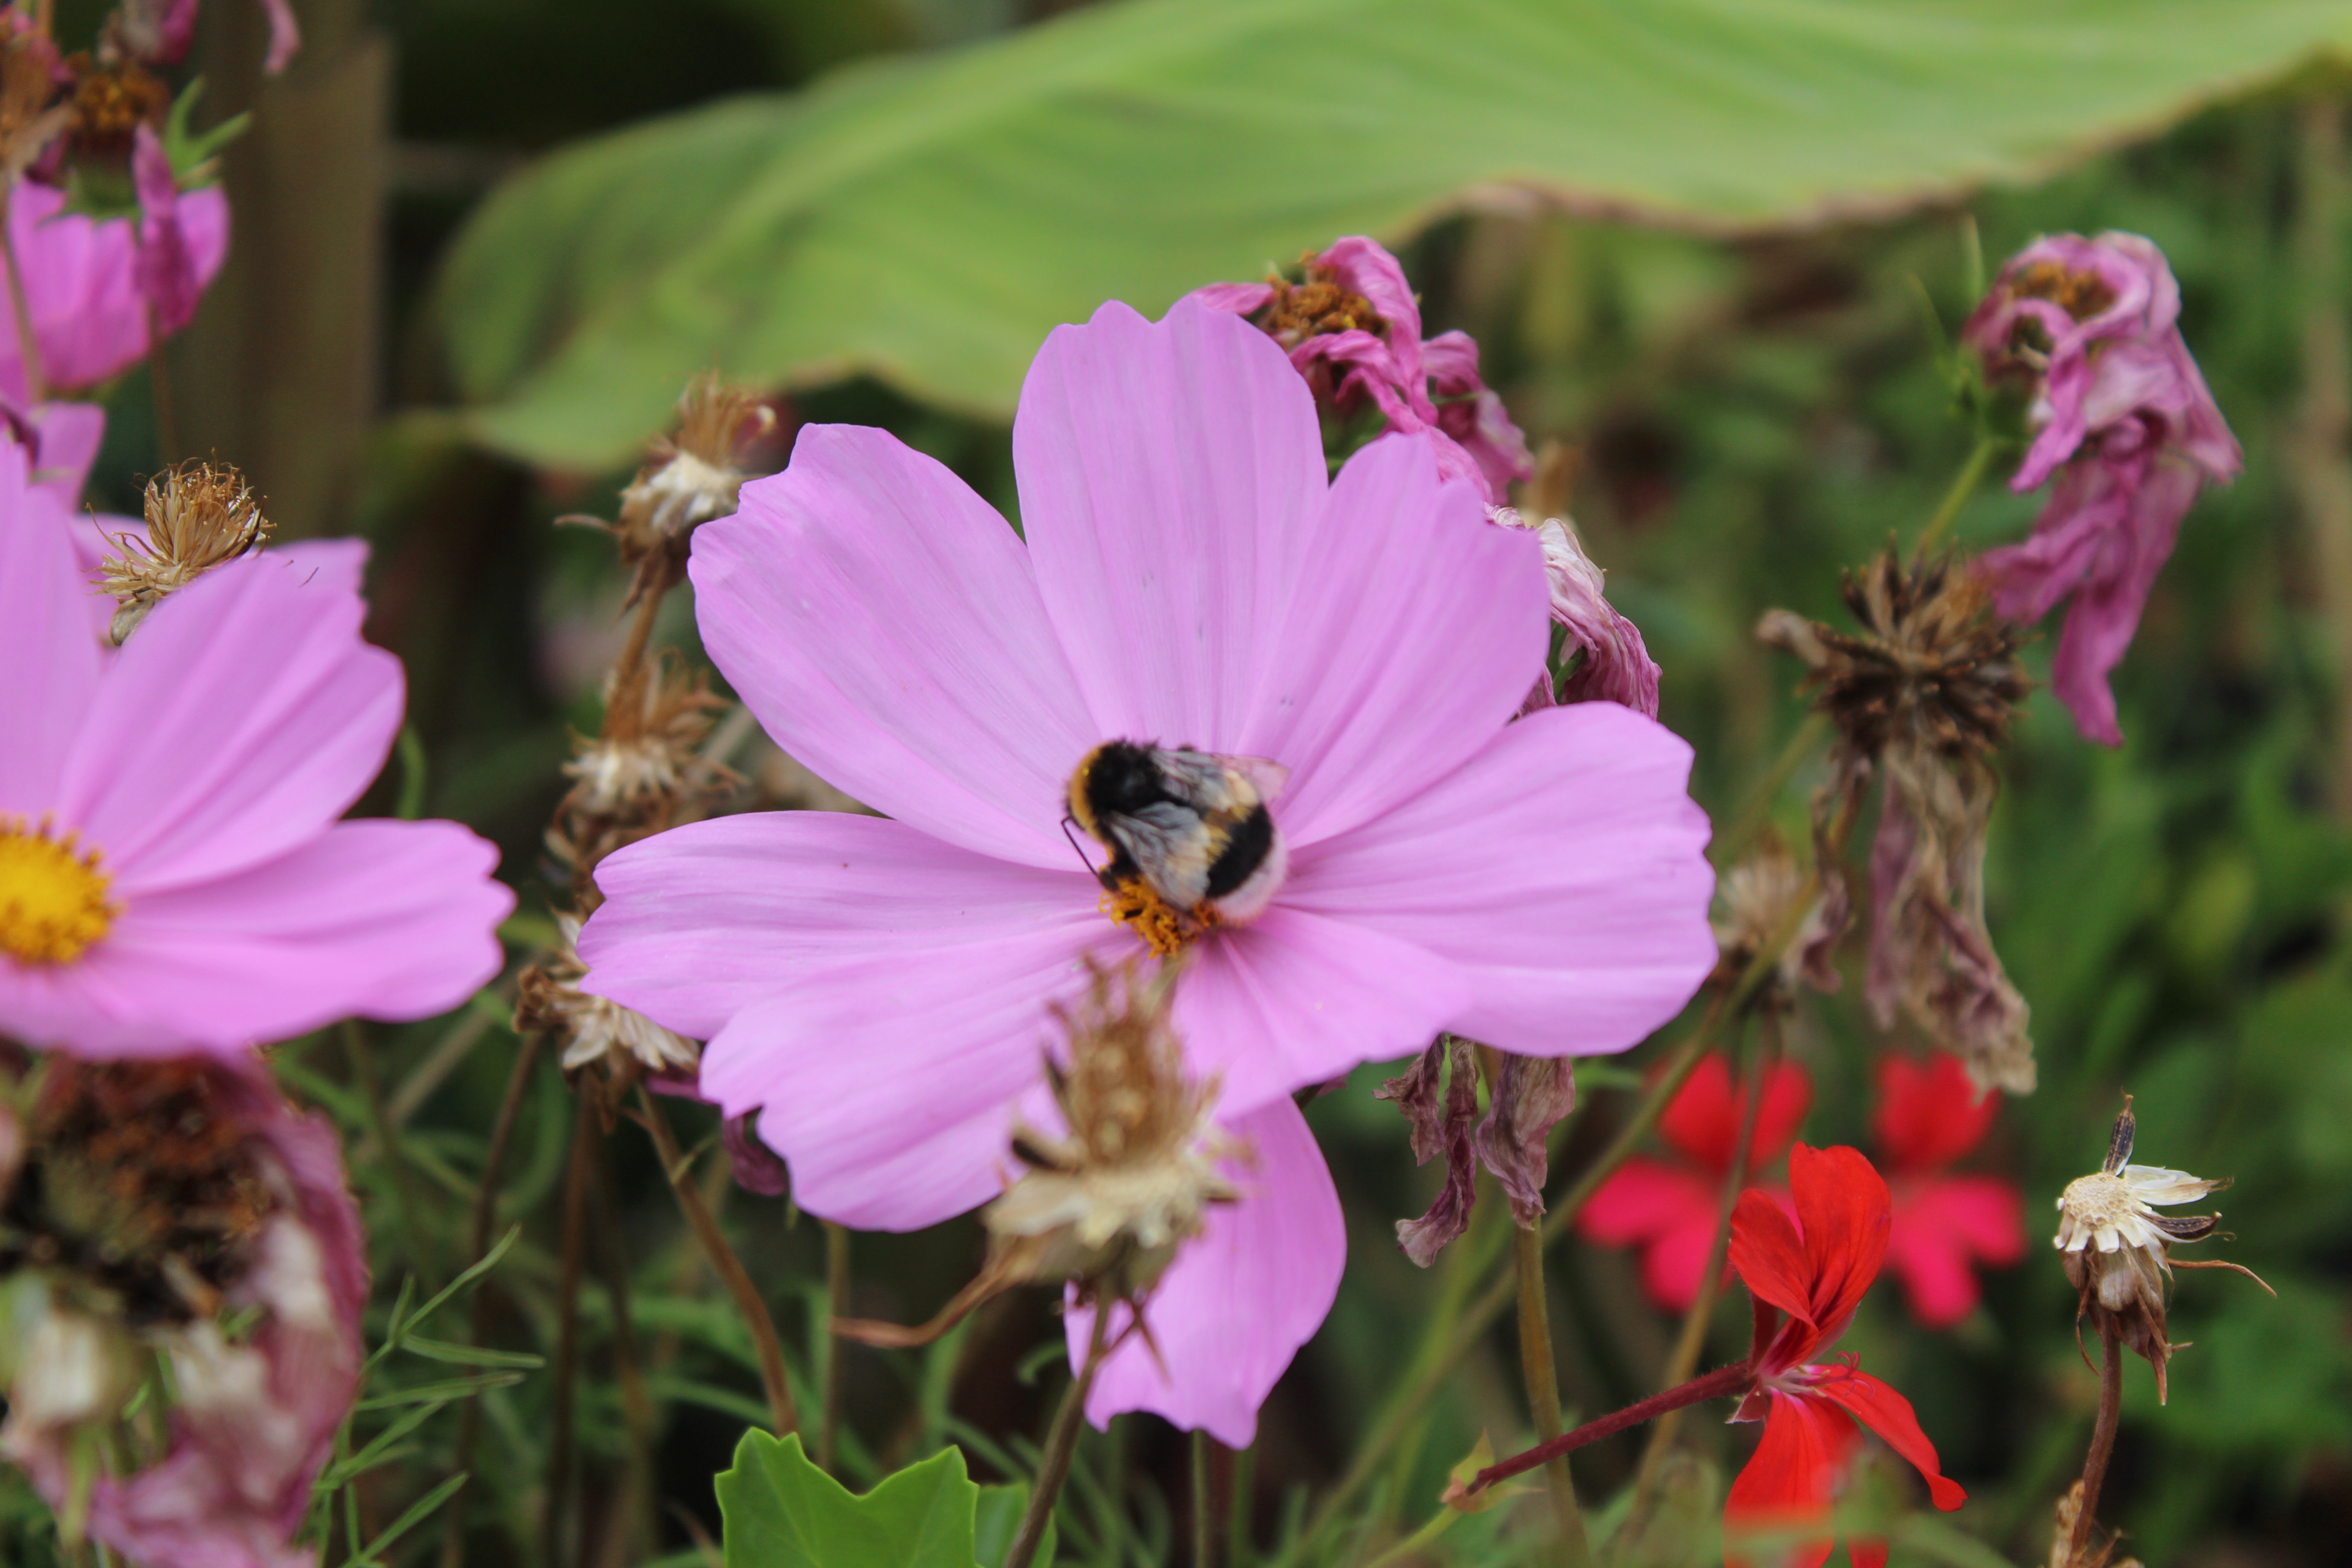
Let's see the image.
```python
from PIL import Image
import requests
img_url = "https://huggingface.co/datasets/huggingface/documentation-images/resolve/main/bee.jpg"
image = Image.open(requests.get(img_url, stream=True).raw).convert("RGB")
```
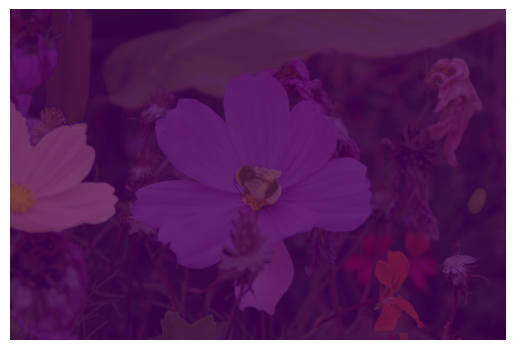
Let's segment everything. `points-per-batch` enables parallel inference of points in segment everything mode. This enables faster inference, but consumes more memory. Moreover, SAM only enables batching over points and not the images. `pred_iou_thresh` is the IoU confidence threshold where only the masks above that certain threshold are returned.
```python
masks = mask_generator(image, points_per_batch=128, pred_iou_thresh=0.88)
```
The `masks` looks like the following:
```bash
{'masks': [array([[False, False, False, ..., True, True, True],
[False, False, False, ..., True, True, True],
[False, False, False, ..., True, True, True],
...,
[False, False, False, ..., False, False, False],
[False, False, False, ..., False, False, False],
[False, False, False, ..., False, False, False]]),
array([[False, False, False, ..., False, False, False],
[False, False, False, ..., False, False, False],
[False, False, False, ..., False, False, False],
...,
'scores': tensor([0.9972, 0.9917,
...,
}
```
We can visualize them like this:
```python
import matplotlib.pyplot as plt
plt.imshow(image, cmap='gray')
for i, mask in enumerate(masks["masks"]):
plt.imshow(mask, cmap='viridis', alpha=0.1, vmin=0, vmax=1)
plt.axis('off')
plt.show()
```
Below is the original image in grayscale with colorful maps overlaid. Very impressive.
## Model Inference
### Point Prompting
You can also use the model without the pipeline. To do so, initialize the model and
the processor.
```python
from transformers import SamModel, SamProcessor
import torch
from accelerate.test_utils.testing import get_backend
# automatically detects the underlying device type (CUDA, CPU, XPU, MPS, etc.)
device, _, _ = get_backend()
model = SamModel.from_pretrained("facebook/sam-vit-base").to(device)
processor = SamProcessor.from_pretrained("facebook/sam-vit-base")
```
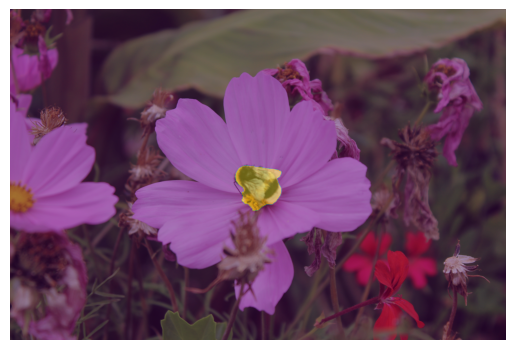
To do point prompting, pass the input point to the processor, then take the processor output
and pass it to the model for inference. To post-process the model output, pass the outputs and
`original_sizes` and `reshaped_input_sizes` we take from the processor's initial output. We need to pass these
since the processor resizes the image, and the output needs to be extrapolated.
```python
input_points = [[[2592, 1728]]] # point location of the bee
inputs = processor(image, input_points=input_points, return_tensors="pt").to(device)
with torch.no_grad():
outputs = model(**inputs)
masks = processor.image_processor.post_process_masks(outputs.pred_masks.cpu(), inputs["original_sizes"].cpu(), inputs["reshaped_input_sizes"].cpu())
```
We can visualize the three masks in the `masks` output.
```python
import matplotlib.pyplot as plt
import numpy as np
fig, axes = plt.subplots(1, 4, figsize=(15, 5))
axes[0].imshow(image)
axes[0].set_title('Original Image')
mask_list = [masks[0][0][0].numpy(), masks[0][0][1].numpy(), masks[0][0][2].numpy()]
for i, mask in enumerate(mask_list, start=1):
overlayed_image = np.array(image).copy()
overlayed_image[:,:,0] = np.where(mask == 1, 255, overlayed_image[:,:,0])
overlayed_image[:,:,1] = np.where(mask == 1, 0, overlayed_image[:,:,1])
overlayed_image[:,:,2] = np.where(mask == 1, 0, overlayed_image[:,:,2])
axes[i].imshow(overlayed_image)
axes[i].set_title(f'Mask {i}')
for ax in axes:
ax.axis('off')
plt.show()
```
### Box Prompting
You can also do box prompting in a similar fashion to point prompting. You can simply pass the input box in the format of a list
`[x_min, y_min, x_max, y_max]` format along with the image to the `processor`. Take the processor output and directly pass it
to the model, then post-process the output again.
```python
# bounding box around the bee
box = [2350, 1600, 2850, 2100]
inputs = processor(
image,
input_boxes=[[[box]]],
return_tensors="pt"
).to("cuda")
with torch.no_grad():
outputs = model(**inputs)
mask = processor.image_processor.post_process_masks(
outputs.pred_masks.cpu(),
inputs["original_sizes"].cpu(),
inputs["reshaped_input_sizes"].cpu()
)[0][0][0].numpy()
```
You can visualize the bounding box around the bee as shown below.
```python
import matplotlib.patches as patches
fig, ax = plt.subplots()
ax.imshow(image)
rectangle = patches.Rectangle((2350, 1600), 500, 500, linewidth=2, edgecolor='r', facecolor='none')
ax.add_patch(rectangle)
ax.axis("off")
plt.show()
```
You can see the inference output below.
```python
fig, ax = plt.subplots()
ax.imshow(image)
ax.imshow(mask, cmap='viridis', alpha=0.4)
ax.axis("off")
plt.show()
```